
 A resourceful Colorado sailor does a professional job in the wilds
Last summer I had to replace thestern tube on my Pacific Seacraft Orion 27, Allegra. It was a stressful and satisfying ordeal and a test of a sailor’s resourcefulness. Allegra is my first boat with an inboard engine.
Before I purchased her I had her professionally surveyed. The survey revealed a small amount of water in the space just below the packing gland and also in the bilge. My surveyor felt that this was an ordinary amount caused by the drip of the traditional- style packing gland. Also noticeable was a repair to the portion of the stern tube that emerges from the deadwood, onto which the packing gland’s hose seats. For the next 18 months of sailing the water never rose, and I, being inexperienced, thought it was normal to have a little water in the bilge.
On a blistering hot July day, my wife and I were boating with friends on a Colorado lake. Rafted together, our four boats drifted quietly on the windless lake. Some of us were swimming, some visiting. Others were reading, but I was below tearing the boat apart from stem to stern. For the first time ever, the automatic bilge pump had come on. The water had definitely risen. Thanks to the Orion’s removable cockpit sole, I found the source. The repaired stern tube stub was seeping.
Not much water had entered the boat yet, and the pump easily cleared it out. The wind was up by this time, so we all separated. My wife and I sailed Allegra back to the marina with apprehension.
The next task was to get Allegra out of the water for repairs. Though not ordinarily considered trailerable, the Orion can be floated onto a heavy trailer and pulled out of the water with a stout pickup truck. Orions seldom need to be hauled with a trailer, I’d guess, but it’s an absolute necessity for me. I live in a remote area where there are no facilities other than a launch ramp used by trailerable boats of all kinds. The key is preparation.
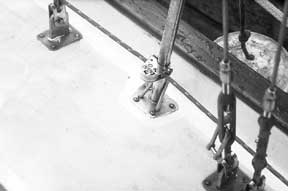
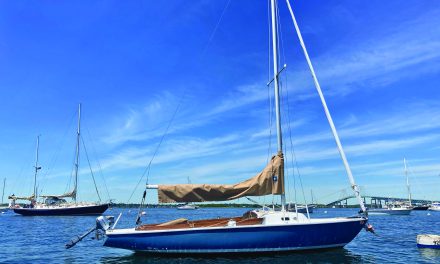
The rudder heel attaches with four bronze bolts through the unpainted area, above. Allegra, undergoes repairs.
Lowered slowly
I purchased my Orion in Seattle and used a Travelift to load her on her trailer. As the lift operator slowly lowered the boat onto the trailer, we carefully adjusted the trailer’s hull supports to match the slack bilges and full keel of the traditionally designed hull. In Colorado I share the trailer with a friend who owns a C&C 29, which has firm bilges and a fin keel with a spade rudder. This means that after he uses the trailer it must be meticulously set up for my boat.
Because I had made diagrams, notes, measurements, and photos of every- thing with the Orion loaded, this was a matter of making the correct adjustments to all the supports.
Preparation for floating the boat onto the trailer involved removing the bobstay so that it would not interfere with the trailer’s stem pad. I did this by adding a temporary jumper stay to my sloop-rigged mast. A padeye on the foredeck just aft of the sampson posts, well backed up, makes this a simple job. I could now disconnect the fore- stay and bobstay together, thereby preventing damage to the ’sprit by an uneven pull from either stay.
We used a one-ton Chevy with a huge gas-guzzling engine. In lieu of the hitch and ball, a very strong, absorbent nylon towing strap of sufficient length and load limit was placed between the truck and trailer so the trailer could sink well into the water without drowning the truck.
 Little traffic
We worked early in the morning when the wind is usually calm or light from ahead and there is little traffic at the ramp. We eased the trailer into the water until only the forward stem pad was visible. The hardest part of this job was driving the boat slowly onto the mostly invisible trailer and keeping her straight. Using a little throttle and forward gear to hold her against the stem pad, I ran forward and secured a strong, low-stretch line to the trailer, then back along each side of the boat to the primary winches.
Taking up tension on each winch held the boat securely on the trailer so I could kill the engine. With a spotter to check things as we inched out of the water, I had only to hold on and keep my fingers crossed. As the driver eased forward, the boat settled perfectly onto each hull support.
Once the boat was just out of the water we had to reconnect the truck to the trailer. We used large wheel chocks and a safety chain so the trailer was never free to run if some- thing should go wrong while we removed the long nylon strap. In four- wheel drive and low gear, the truck had no difficulty pulling the heavy load up the steep ramp. It is imperative to work safely. A runaway trailer could do horrible damage to anything or anyone in its path. All equipment, connections, and fittings must be of adequate strength for the job. It’s important to have lots of help.
Once the boat was parked in the yard with nearby access to electricity and water, I began a little exploratory surgery, carefully grinding with a Dremel tool to examine the problem. Bit by bit I began to see that the portion of stern tube that protruded from the deadwood had been broken or cut off, then reglassed into place. The original repair was not done well; the repair material looked a lot like Bondo, a porous material not suited to this purpose.
Glassfiber and resin covered the Bondo, but water had found its way past this repair and into my bilge. I moved up to a bigger grinder and removed all traces of old tube, Bondo, and soggy material, taking it all down to fresh clean glass and deadwood filler. The work thus far was easier than the heat. The hot summer sun moved across the sky almost straight above, roasting me in the depths of my engine compartment. I was thankful for my removable cockpit sole. I can’t imagine the job without this feature.
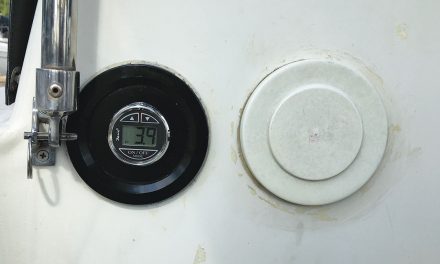
New dripless shaft seal.
Only slightly better
The easiest fix, I thought, would be to glass the piece of tube back on with better materials. However, this seemed like an only slightly better repair than before and still inadequate. So I began to research how to go about replacing the entire tube.
After several days spent calling repair shops all over the country, I found that stern-tube replacement is evidently uncommon because no one I talked to had actually done it. Nevertheless, I spent an hour on the phone with a helpful tech rep from Gougeon Brothers. And I eventually found Jim at H&H Propeller in Salem, Mass., a supplier of tube material, bearings, and seals at reasonable prices. Jim was also very helpful. I read This Old Boat by Don Casey and Boat Owners Mechanical and Technical Manual by Nigel Calder. I called West Marine also, as there are no suppliers near my home.
After all this research, I decided on a wholly unscientific approach: grind the entire tube to dust with a grinding drum on the end of my hand drill. This saved me the trouble of trying to keep the hole perfectly round and perfectly aligned. I would also have room to add high-density filler around the new tube and wiggle room to align the shaft/ bearing/tube/seal assembly to the engine and hull.
Thanks to the Orion’s simple design, the rudder came out in half an hour.
The harder task was digging a hole in the rock-hard ground beneath the boat to allow the rudder room to drop out. Next the prop came off, followed by the shaft and Cutless bearing. Other than the fact that the rudder heel bolts were too short (the nuts only threaded on about half-way), all this was straightforward and easy.
John blesses his Orion’s removable cockpit sole which allowed him to do the repairs without pulling the engine.
Rubber drums
Now came the nasty part. It took me most of a day working with my drill (DeWalt makes a great drill), grinder, and respirator to remove the old tube. I used a long extension, rubber drums of various sizes, and coarse-grit sleeves. I ended up with a hole two to three inches in diameter and 10 inches deep. It was another very hot, dirty job.
After cleaning up endless dust, rebuilding came next. With the new Cutless bearing inserted into one end of the tube, a shiny new PSS dripless seal mounted on the other end, the shaft mounted to the transmission, and the tube in place, a friend and I aligned the whole assembly with the engine and hull.
As we tweaked the engine mounts, we found another clue to the cause of the original tube break. The engine had at one time been shifted to port, leaving scratches in the fiberglass pan. This may have caused the drive shaft to hit the tube, which had been glassed back on at a slight angle, also to port. We found no other evidence of damage.
Using high-density filler, I stuffed as much epoxy as I could into the outer end of the gap between the hull and the tube, and again into the inner end.
At the inner end I left a small gap at the top of the hole. When the filler was firm but still tacky to the touch (I used a slow hardener), I injected unmodified epoxy into the void between the two ends, adding more and more until it was full.
Again I used slow hardener to allow time for the epoxy to settle in and any air bubbles to surface.
When this had kicked, I filled the last little gap and built up material around the tube, fairing it to the surface of the deadwood using the high- density stuff. I had masked off the inner portion of the tube to protect my new dripless seal and also the shaft where it emerges from the seal. A little fairing and barrier additive on the outer end made a nice, smooth tube/hull transition.
At the ramp with a long leash to the tow vehicle.
Fine-tuning alignment
After everything had cured, I spent several hours moving the engine this way and that, millimeter by millimeter, to fine-tune the alignment. I also took this opportunity to repair a small crack in the upper aft corner of the rudder and to renew my seacocks. All that remained was to reinstall the prop and rudder (with new, longer, silicon-bronze heel bolts) and to touch up all areas with bottom paint.
I sat back and thought through every aspect of the job. I did not want to launch the boat only to find that I had neglected something. Although relaunching the boat was a high-stress situation, it was tremendously satisfying to find that I had done it all right: the bilges were and still are dry enough for the dust bunnies to move in, and the driveshaft spins with no vibration. I am confident the job was done right, but proof will come in time.
As facilities here are minimal, there are no repair people qualified to do this type of job. I belong to a small club called San Juan Sailing. We rely on each other for expertise, equipment, support, and camaraderie. I certainly could not have done the job without them.