
A homemade replacement is the answer
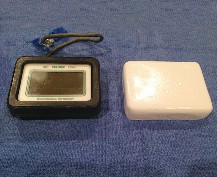
My good old boat was a former racer and came with a KVH Sailcomp electronic compass and sailing instrument. As it was quite old, the LCD display had become barely readable. I could tell it was working, just not usefully visible. I priced a new display at over $600 and quickly decided I could do without. Therefore, when the sun cover blew off in a thunderstorm, I was not too concerned. Later, though, while browsing on eBay, I came across a used display. It was for sale as “Sailboat Parts” with nothing to make it searchable. I snagged it for $19 including shipping and was delighted to find it worked well.
Now I needed a sun cover. The manufacturer wanted $59 for a small plastic cover. That made for another easy decision. Some instruments are fairly common, and the sun covers — as they tend to outlive the electronics (unless they go overboard) — can be found occasionally at swap meets or consignment stores. The Sailcomp, however, was not a popular instrument, and I had no luck with a quick search for a cheap alternative. I considered a Sunbrella cover with an elastic rim but wanted a better match with my other rigid plastic covers. I decided to fabricate my own from fiberglass. It took two tries to get one I was happy with, but now I have a spare.
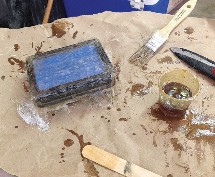
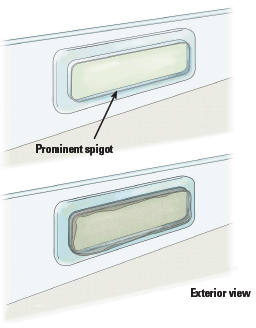
After protecting the screen and wrapping the unit with packaging tape, John applied the first light layer of fiberglass.
Learning by doing
I put blue painter’s tape on the recessed display face to protect it. On my first attempt, I wrapped a layer of wax paper around the instrument before applying the fiberglass and resin. This released easily after the resin cured but did not leave a smooth surface.
For my second attempt, I used a taut layer of plastic packaging tape instead of the wax paper. I wanted it to be thin for a snug fit.
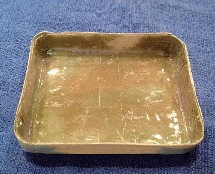
He faired it inside and out with filler before painting it.
The hard part was getting the corners done well. The trick that worked on the second try was to use very light (1 ounce per yard) cloth that’s sometimes called angel hair. I made two full layers as well as strips for the edges. I also cut some triangles for the corners but could not get them to smooth out. I set it in the sun to harden a bit, until it reached the green stage, then trimmed the overhanging edges. With a little pulling on the mounting screws on the back of the unit, it popped off the display.
The completed cover fits the instrument snugly, and looks smart when in use.
Once it was off, it was not thick enough. I should have used four layers of cloth. Instead, I added one layer of mat, which made it stiff enough. I then sanded the rough spots, added some Bondo body filler, and sanded it smooth. A couple of coats of paint from a spray can made it pretty. (I had to scrape the paint off the inside of the rim to make it fit!)
The first cover was a little loose. I fixed that with some layers of electrical tape on the inside edge of the cover. Now I’m ready to protect my new display from the sun.
