
Ferry it from shore to ship without lifting a drop
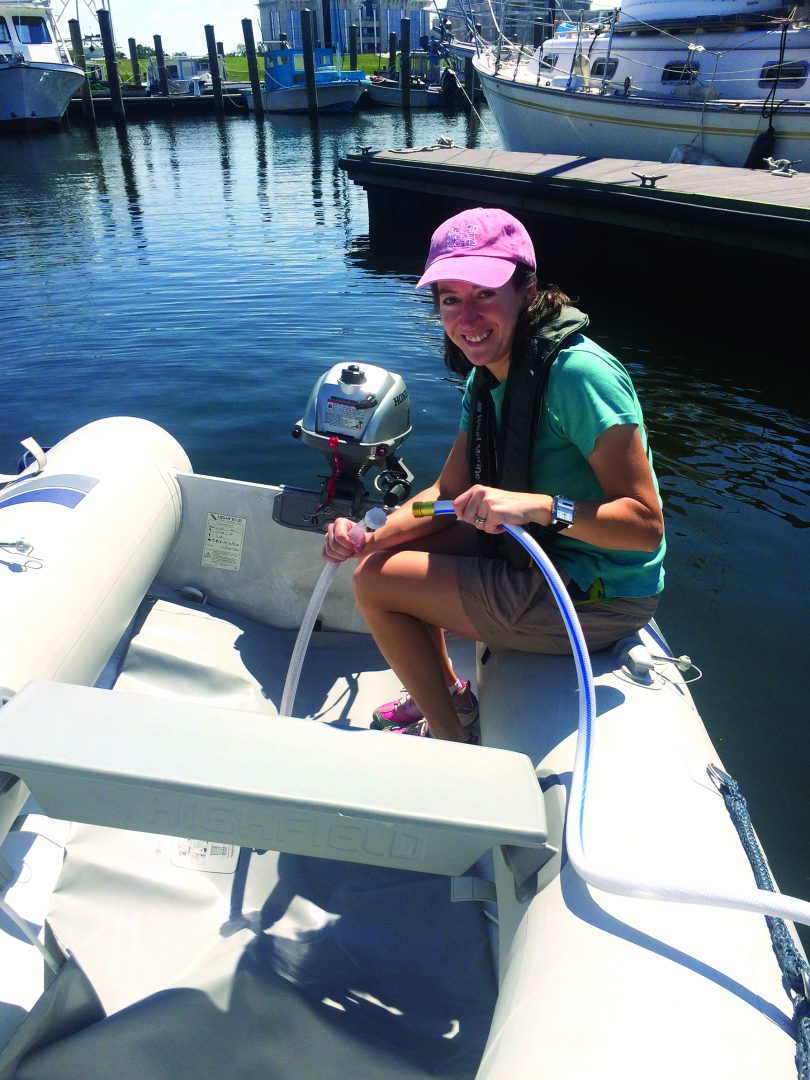
To fill up, Janna connects the public water hose to the garden hose fitting on the dinghy bladder. When done, she secures the garden hose plug so no water can spill on the ride back to the boat.
When you’re on the hook, you fill your dinghy with four basic commodities in addition to passengers: trash, diesel, gas, and water. Water is the heaviest of the four. Fresh water weighs 8 pounds per gallon. (Diesel and gas weigh only about 7 and 6 pounds per gallon, respectively.) Try carrying and lifting a 40-pound jerry can one-handed up and down ladders on and off a pitching dinghy several feet below the dock or your stern and you will soon wish your partner had studied to be a chiropractor. Forget about having one hand for the boat while carrying one of those blue bricks. The best my wife and I can do once a full 5-gallon jug is on board is just scoot it along the deck.
While in the Cruisers’ Republic of Marathon, Florida, where more than 200 boats swing on balls during the winter months, I met a genius. He was 3 feet below me, filling up a water bladder from the potable water hose.
I ran to the local marine store and shamelessly copied his idea. For the rest of the season, which we spent mostly at anchor or on a mooring ball, I never once threw out my back hauling water.
Put off by RO
The supposed alternative to lugging water jugs are reverse-osmosis (RO) desalinators, better known as watermakers. These devices are crazy expensive even by marine standards. The smallest-capacity new watermaker costs $4,000 and higher-capacity units can easily go for $10,000. In
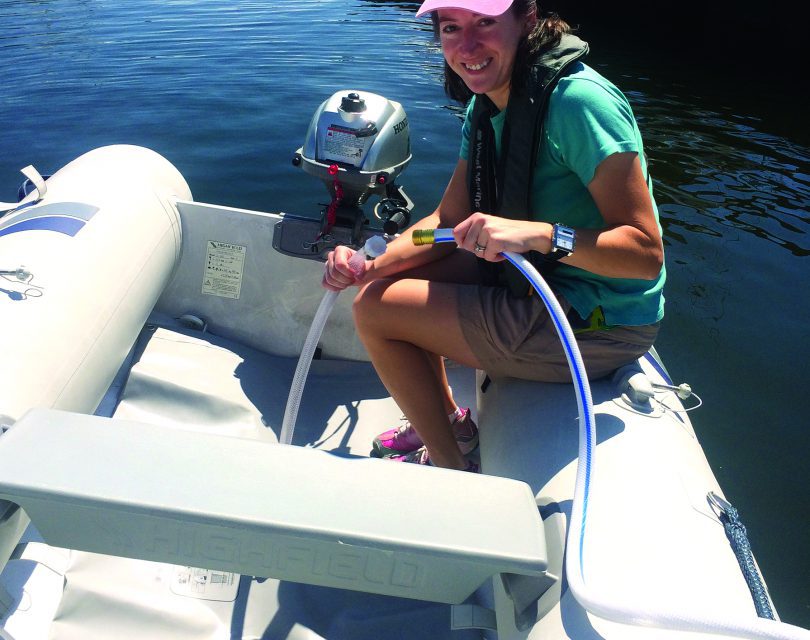
With the dinghy tied to the boat’s stern, a garden hose connects the bladder to the 12-volt pump (not pictured) that transfers the water into the ship’s water tanks.
January 2003, Good Old Boat ran an article by Guy Stevens on making your own watermaker. (See also Randy Baker’s “How to Make a Watermaker,” parts 1 and 2, May and July 2010 and Don Launer’s “Watermakers 101” in March 2011 –Eds.) Applying the greatest of frugality and do-it-yourself spirit, Guy could only build a 120-volt system for $2,500!
Beside the expense, watermakers are tricky to install and maintain. They involve lift pumps, prefilters, brine outtakes, seawater through- hulls, high-pressure pumps, pickling, membranes, cleaning chemicals, and on and on. It sounds like a recipe for troubleshooting your days away in paradise. And they suck energy. You have to have massive solar panels, more generator run time, or spend more hours running your engine just to keep your watermaker humming.
In contrast, for less than a tenth the cost of a new watermaker, a dinghy bladder can add 40 gallons per trip to your tanks — the equivalent of eight 5-gallon jugs — and is virtually maintenance-and breakdown-free. It takes only a few amps to fill your tanks and no heavy lifting is involved.
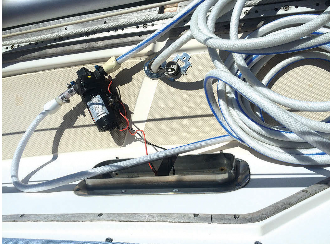
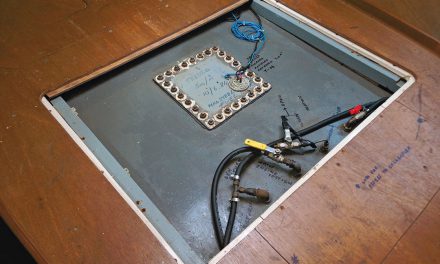
Dinghy bladder teeing into the boat’s 12-volt pump
A bladder alternative
First, you need a bladder tank. The bladder we chose holds 40 gallons and comes with a 5⁄8-inch inside-diameter (ID) barb and a 1½-inch fitting, both of which you install yourself. For the purposes of your dinghy bladder you want to install only the 5⁄8-inch fitting. Then you need a length of drinking- water-safe hose with a female garden hose adapter attached so you can use the closest public water spigot ashore in your anchorage or mooring field.
Use a flathead screwdriver to twist on a few hose clamps and you’re done with the dinghy tank. Buy a cap for the hose adapter, too, so you don’t lose any precious fresh water on your bumpy dinghy ride back to the mother ship.
Forty gallons of fresh water weighs 320 pounds. Need I mention that it’s a good idea to make sure your dinghy can hold you and the water before filling the tank? Almost all inflatable dinghies on which you can fit an outboard have a capacity of more than 500 pounds. We started with an 8.5-foot roll-up dinghy with a slatted floor that claimed to have about a 600-pound capacity. We eventually traded up to a rigid inflatable boat (RIB) of a similar size that had a capacity of 750 pounds.
Hard dinghies tend to have less capacity. Be careful if you have one. My wife is old-school and wanted a hard dinghy she could row. It had a capacity of only 400-pounds. If we used that dinghy for water runs, we could only half fill the bladder. That being said, our boat and our dinghies were much smaller than other boats that we saw on our Bahamas cruise. An extra 300 pounds was a proverbial drop in the tender for most other boaters. Bladders are available with capacities from 15 to 40 gallons, so smaller tenders still can use a bladder safely.
From bladder to tank
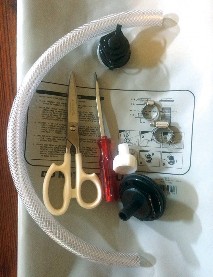
All that’s needed to install the fitting in the bladder tank is a screwdriver and scissors. Instructions are printed on the tank.
Once you have all that heavy water in the dinghy you need to get it out of the bladder and into the tank or tanks in your boat. I’m pretty sure that if you attached a halyard to the grommet on the bladder, it would rip the tank apart before you could hoist it off the floor of the tender.
Instead, you need to pump it out. To do this, you have two options: you can use your existing electric freshwater pump or you can buy a washdown pump for the express purpose of decanting from the bladder into your tanks.
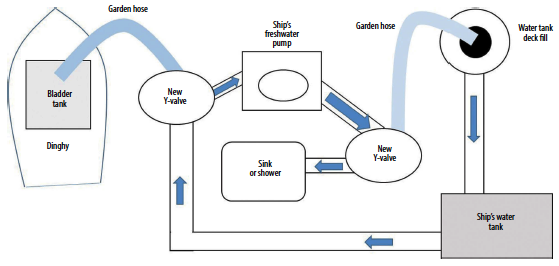
To use the freshwater pump, you’ll need to install a 3-way valve on each side of it, one to the intake so you can attach a drinking-water-safe hose from the bladder and another to the outlet so you can run a hose to the water tank’s deck fill (see the diagram on page 57). I did not do this because our freshwater pump is in the dirty and cramped engine compartment. I also worried about spraying water on the engine. Nevertheless, at about $300 this is the less-expensive setup based on my estimates. I assumed in both setups that the boat already had one drinking- water-safe garden hose.
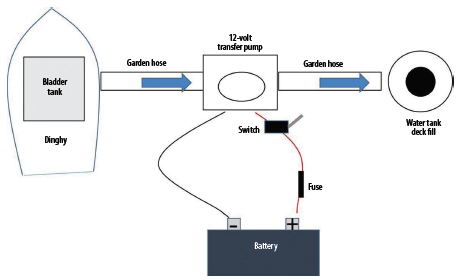
For only about $70 more, you can buy an electric run-dry washdown pump with ¾-inch garden hose fittings (see the diagram above). You save a little money in this setup because you don’t need two 3-way valves. Attach two drinking-water-safe garden hoses to the new water pump. One hose goes from the bladder tank in the dinghy to the pump’s intake and the other from the pump’s outlet to the deck fill for your water tank. (Don’t use this pump for saltwater washdowns or you’ll contaminate your freshwater tank!)
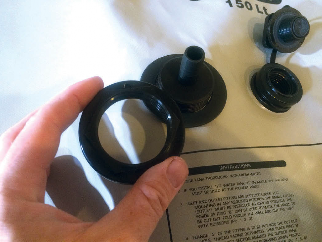
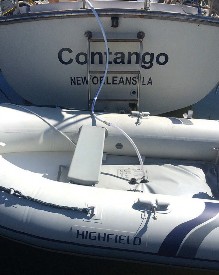
The barb fitting is easy to install in the bladder tank, above left. The smaller fitting is a pre-installed vent. Linus uses a 12-volt washdown pump to which he has attached two male garden hose fittings.
If your batteries are not too hard to get to, you can make this pump portable by connecting it with alligator clips. That is what I use on my boat. I take out the pump once or twice a week when I need to top off the water tank and clip it into a battery close to a porthole and the main water tank. Adding a switch, which I taped to the pump, avoids scary sparks when clipping on the second alligator clip.
He connects the hose on the intake side to the bladder tank and the one on the outlet goes to the deck fill. With the rather long discharge hose he can reach water fills all over the boat.
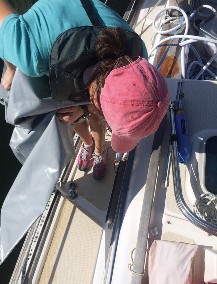
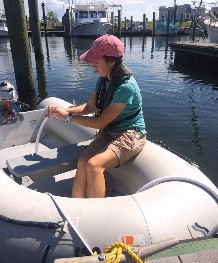
After the pump sucks air, Janna dumps the remaining gallon or two from the bladder into the deck fill, at left. If the bladder contains more water than is needed to top off the tanks, they can use the excess to wash down the deck, fill a jerry can, or simply leave it in the dinghy until it’s needed.
You could also permanently mount the new pump on your boat and buy the appropriate hose fittings, which are not in the estimates but run between $30 to $100 for each of the inlet and outlet fittings. You also will have to run ½-inch-ID freshwater hose inside your boat to and from wherever the new pump is mounted to the inlet and outlet fittings on deck.
The basic setup is a bladder with a garden hose attachment, two freshwater-safe garden hoses to stretch from the dinghy in the water to the pump and from the pump to your water deck fill, and an electric (run dry) marine pump. Once you have those three elements, you can make the pump and fittings portable or permanent, whatever suits you and your boat.
Once all the hoses are connected, turn on your pump and let it do the work until it starts sucking a lot of air or your boat’s water tank is over- flowing. When the air-to-water ratio gets too high, it’s easy enough to lift the bladder with the last gallon or two in it from the dinghy and dump it into the deck fill.
It’s as simple as that. You don’t need to clutter your decks with eight water jugs for a 40-gallon capacity. You can store your new bladder, pump, and extra hose in the space of one 5-gallon water jug. When your neighbors are waiting for parts for their watermakers or hauling heavy blue jugs, you can be slicing coconuts.
